What is Traffic Exchange Ads? And how does it work?
Traffic Exchange Ads is a suspicious platform used to deliver ads to internet users all over the globe. In other words, this dubious service inject tons of ads on browsers. What makes it even more suspicious is that it is related to several ad-supported applications like traffic.io, online.io, etc. which is no wonder why security experts categorized Traffic Exchange Ads as an adware or ad-supported program and a potentially unwanted program.
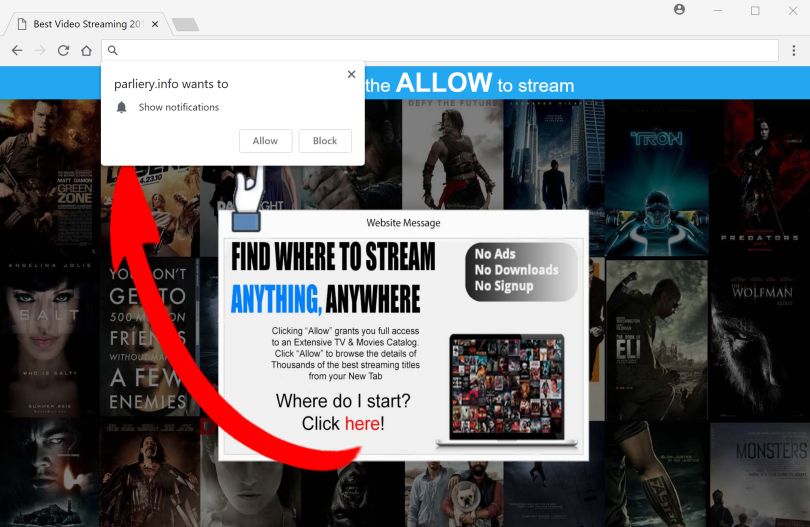
If installed, it will bombard browsers with constant redirects, banners, pop-ups, coupons and other commercial contents. Some of these ads can get quite intrusive to the point where it covers the content of websites that do not usually display promotions. As a result, browsing experience diminishes and worse, you could end up visiting phishing or malware-laden domains that can compromise online safety.
As mentioned, Traffic Exchange Ads can cause redirects to suspicious sites. It could take you to a site that lures you into answering an online survey, or site that claims you’ve won some prize and trick you into providing sensitive information. It could also redirect you to sites that hosts tech support scams that lead you to believe that your computer is infected with some malware.
Moreover, Traffic Exchange Ads can also spy on all your activities online in order to collect browsing information such as websites you visit frequently, browsing history, ads you’ve clicked, email address, and many more. The data obtained is used to generate more sponsored content and could be shared with the affiliated sites of Traffic Exchange Ads.
How does Traffic Exchange Ads circulate the web?
Traffic Exchange Ads circulate the web using ads. However, if you keep getting redirected to this shady platform then it only means that there is an ad-supported program or adware program that’s triggering the redirects. Adware programs are commonly found on freeware and shareware packages which means that you might have unknowingly installed the adware when you installed software bundles. To prevent adware programs from infiltrating your computer, you must always opt for the Custom or Advanced setup and not the standard one.
Get rid of Traffic Exchange Ads from your browsers and computer as well as the adware program that triggers it with the help of the following removal instructions.
Step 1: Close all the browsers affected by Ads by Aura. If you’re having a hard time closing them, you can close them using the Task Manager just tap on Ctrl + Shift + Esc.
Step 2: Next, go to Processes and look for the process of the browser you’re unable to close as well as other dubious processes that could be related to Traffic Exchange Ads and then right click on each one of them and select End Process or End Task to kill their processes.
Step 3: Then open the Programs and Features section in Control Panel. To do so, tap the Windows key + R, then type in appwiz.cpl and then click OK or press Enter.
Step 4: From the list of programs installed, look for any suspicious program that could be related to Traffic Exchange Ads and then Uninstall them.

Step 5: Edit your Hosts File
- Tap the Win + R keys to open then type in %WinDir% and then click OK.
- Go to System32/drivers/etc.
- Open the hosts file using Notepad.
- Delete all the entries containing Traffic Exchange Ads.
- After that, save the changes you’ve made and close the file.
Step 6: Reset all your browsers to default to their default state.
Mozilla Firefox
- Open Firefox and click the icon that looks like a three stacked lines located at the top-right section of the browser.
- Next, select the question mark icon from the drop-down menu.
- Then select “Troubleshooting information” from the slide-out menu.
- After that, click on the “Reset Firefox” button located at the top-right section of the newly opened web page.
- Now select “Reset Firefox” in the confirmation pop-up window that appears.
Google Chrome
- Open Google Chrome, then tap the Alt + F keys.
- After that, click on Settings.
- Next, scroll down until you see the Advanced option, once you see it, click on it.
- After clicking the Advanced option, go to the “Restore and clean up option and click on the “Restore settings to their original defaults” option to reset Google Chrome.
- Now restart Google Chrome.
Internet Explorer
- Launch Internet Explorer.
- Next, click the wrench icon for Settings.
- Then click Internet Options.
- After that, go to the Advanced tab.
- From there, click the Reset button. This will reset Internet Explorer’s settings to their default condition.
- Now click OK to save the changes made.
Step 7: Hold down Windows + E keys simultaneously to open File Explorer.
Step 8: Navigate to the following directories and look for suspicious files associated to Traffic Exchange Ads as well as the adware program that’s behind it and delete it/them.
- %USERPROFILE%\Downloads
- %USERPROFILE%\Desktop
- %TEMP%
Step 9: Close the File Explorer.
Step 10: Empty the Recycle Bin and afterwards, you have to flush the DNS cache. To do that, just, right click on the Start button and click on Command Prompt (administrator). From there, type the “ipconfig /flushdns” command and hit Enter to flush the DNS.
Follow the advanced instructions below to ensure the removal of Traffic Exchange Ads using [product-name] as well as all the file residues it left behind.
Perform a full system scan using [product-code]. To do so, follow these steps:
- Turn on your computer. If it’s already on, you have to reboot it.
- After that, the BIOS screen will be displayed, but if Windows pops up instead, reboot your computer and try again. Once you’re on the BIOS screen, repeat pressing F8, by doing so the Advanced Option shows up.

- To navigate the Advanced Option use the arrow keys and select Safe Mode with Networking then hit
- Windows will now load the Safe Mode with Networking.
- Press and hold both R key and Windows key.

- If done correctly, the Windows Run Box will show up.
- Type in the URL address, [product-url] in the Run dialog box and then tap Enter or click OK.
- After that, it will download the program. Wait for the download to finish and then open the launcher to install the program.
- Once the installation process is completed, run [product-code] to perform a full system scan.

- After the scan is completed click the “Fix, Clean & Optimize Now” button.